
How to Ship Aquarium Fish in the Mail
In a previous article, we talked about how to breed and sell aquarium fish to help offset the costs of your aquarium hobby. Selling to a local fish store is much easier because you can safely transport the animals yourself, but if you do not have any stores nearby, selling fish via online classified ads or auction websites like AquaBid is an alternative to consider. While Aquarium Co-Op no longer sells fish online, we have plenty of past experiences and best practices when it comes to shipping live animals through the United States Postal Service (USPS).
How to Ship Live Fish, Shrimp, and Snails
- Gather the materials
- USPS Priority Mail Flat Rate Medium or Large Box
- 0.5-inch-thick foam board insulation or Styrofoam sheets
- Breather bags or fish bags
- Rubber bands
- Packaging tape and scissors
- Newspaper, packing peanuts, crinkle-cut filler, or other packaging materials
- 72-hour heat pack with a paper lunch bag or a cold pack with a piece of fabric and Ziploc bag
- “Live Fish” labels
- Fish net
- Specimen container
- Get the recipient's zip code so you can check the weather forecast at both the departure and arrival locations. Try to avoid shipping animals if either location’s temperature reaches below 32°F (0°C) or above 90°F (32°C).
- Do not feed the animals for 1-2 days before the shipping date.
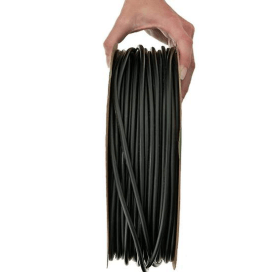
- Securely tape together the USPS Priority Mail box, and then cut out 6 pieces of insulation to fit in the top, bottom, and four sides of the box. (The top and bottom pieces should cover the entire base of the box. The four side pieces should interlock to prevent them from falling down as easily.) Insert the bottom and side insulation pieces into the box.

Shipping box with Styrofoam insulation sheets
- If the weather is on the hotter side, prepare the ice pack by wrapping it in a piece of fabric and placing it in a Ziploc bag to minimize condensation. If the weather is on the colder side, remove the heat pack from the plastic wrapper. Once you have confirmed it is warming up, place it in a paper lunch bag.
- Scoop out some water from your fish tank into the specimen container or catch cup. Net out the fish that will be shipped and place them in catch cup.
- For most animals, we place them in gas-permeable breather bags, which allow fresh oxygen to enter and carbon dioxide to exit. Split up the fish into multiple bags or place only one fish per bag to minimize causalities if a bag bursts or a fish dies. Try to use as much water as possible so that the water parameters are more stable and the fish has more room to move. Squeeze all the air of the bag while twisting the neck of the bag, and then tie a tight knot on top. Attach a rubber band below the knot and loop it around the neck of the bag as many times as possible.

Breather bag with no extra air inside, sealed using a knot and rubber band
- Use regular fish bags if you are shipping betta fish that require some air in the bag or fish with spines that may puncture a breather bag. Fill two-thirds of the bag with water and the remaining one-third with air. Seal the first bag with a rubber band, and then slide it upside-down into a second fish bag. Seal the second bag with a rubber band.
- When shipping shrimp, some sellers add a piece of fabric mesh so that shrimp have something to hold onto while in transit.
- Place the fish bags on a towel or newspaper for 10 minutes to check for leaks. If using breather bags, wrap them with a porous material (e.g., paper towels or newspaper) so they won’t touch any nonporous materials that may interfere with gas exchange (e.g., Styrofoam or other plastic bags).
- Place the cold or heat pack in the box, and then add the fish bags. Add packing material or a piece of cardboard between the fish bags and the cold or heat pack. This prevents the animals from getting too cold or hot. Fill the remaining gaps with packing material so that the contents are snug and the box does not rattle.

Shipping box with a heat pack in a brown paper bag, two breather bags containing live fish, and crinkle-cut plastic filler
- Place the last piece of insulation board on top, and tape up the box. Attach the mailing address and “Live Fish” labels to the box, and cover them with packaging tape so they won’t get wet. Reinforce the box with several additional strips of tape if needed.
Many fish retailers only ship on Mondays and Tuesdays so that their fish will hopefully arrive before Sunday (when USPS typically only delivers Priority Mail Express and other specialty packages). Other sellers choose to drop off their fish on Saturdays because the shipping volume can be a bit lower and mail is still transported over the weekend. You may also choose to only offer the more expensive Priority Mail Express shipping to increase the likelihood that your fish are delivered within one to two days.
Because of potential delays in shipping (especially during the holiday season), we always use heat packs that last longer than the intended delivery time. If you are mailing live animals during the colder seasons, make sure to include a 72-hour heat pack to keep your fish warm and healthy while in transit.